K.A.W.A.N-K.A.W.A.N.K.U

Thursday, January 29, 2009

How to wash cloth diapers?


Washing cloth diapers is so easy, you won`t believe it. Don`t let anyone tell you how gross and inconvenient it is. Read more about your options here...

Many moms worry that cloth diapers will give them more things to do, and will take a lot of time and effort to wash, also they worry about stain and smell. That won`t be necessary. Here are the simple guide to wash your dirty diaper:

Storing dirty diaper: Wet pail VS Dry pail

There are 2 basic methods for storing wet and soiled cloth diapers, the wet pail method and the dry pail method. In the wet pail method, all cloth diapers are placed in a pail filled with water. Storing the diapers in water (usually accompanied by baking soda) is said to help prevent stains from setting. When wash day comes, the water is drained in the bathtub or toilet and then the diapers go into the wash. This method has lost much of its popularity due to odor issues that arise from stagnant water, the potential for messiness, and the potential drowning hazard present by having a pail full of water in the vicinity of children. A wet pail can also be inconvenient when you consider that AIOs and diaper covers often need a separate (dry) pail.

The dry pail method seems to be the preferred method, whereby wet and soiled diapers are merely placed within a covered (or uncovered) pail with no pre-soaking. Odors can easily be controlled by sprinkling baking soda on the diapers or putting a deodorant disc at the bottom of the pail.

Which Washing Method Works Best?

We recommend that you wash no more than two dozen diapers at one time, too much friction can cause pilling. Because detergent build-up can occur we also recommend that you use less detergent than you normally would. Send your diapers through normal cycles like you wash your laundry in your washing machine.(no need pre-soak).Use a 1/4 cup of your preferred detergent.No fabric softener needed. It will cause build up in the fleece fabric. If you are experiencing odor problems, 2-3 drops of Tea Tree Oil or Dettol can help. And make sure you fasten all velcro tabs to avoid diaper chains.

After the washing portion is finished, your diaper should smell fresh and clean with no hint of urines, feces, ammonia or other unpleasant odors. Every now and them you may need to do an extra rinse to help eliminate odors caused from a build-up of detergent. Once they are freshly cleaned they are ready to go in the dryer or be line dried. The heat from the dryer or the sun help to sanitize the diapers. Generally you should dry your diapers on hot for 60-90 minutes, with some AIOs or extra thick diapers taking longer. Make sure you check the washing and drying instructions for every brand of diaper you buy, to extend the overall life of your diapers.

If your diapers do not smell clean to you – if you can still detect a lingering diaper odor – you should wash them again. The odor you’re smelling most likely means there is bacteria present in your diapers which could cause irritation to your baby and potential problems like diaper rash.

If you want to cut your electricity usage by 50-60% then line drying is a good option. Not only do you help to conserve energy but the sun is wonderful for getting out tough stains on diapers. To avoid stiff diapers, set them out on the line during early morning or late afternoon hours when they will not dry as fast. Line drying your diapers will also extend their life, especially AIOs and covers.

Which Detergent Should I use?

Generally you will need to use less detergent than normal for washing cloth diapers as they are easily susceptible to build-up. The detergent you use for washing your other clothing will usually work just fine for cloth diapers as well. There are some detergents that work especially well for cloth diapers though and fragrance free detergents are usually best for something so close to your babies skin.

Don`t forget the amazing cleaning power of adding baking soda to your wash cycle and distilled white vinegar to your rinse cycle. Not only are they highly effective they are also cheap!

It is best to avoid detergents with whitening enzymes such as Arm and Hammer Advanced Detergent Action. The enzymes can actually attack baby`s sensitive skin and cause horrible, blistering rashes! You should also avoid void washing cloth diapers with soap products since repeated washing with soap creates a waxy build-up that reduces the absorbency of cloth diapers.

Should I Dunk in the Toilet?

Many parents cringe at the thought of having to rinse soiled diapers before washing them. This is the reason why many would prefer to use disposables and "throw away" the problem. Dunking them in the toilet is not necessary however. In most cases, all that you need to do is lightly shake any excess feces into the toilet, perhaps using a bit of toilet paper to remove stubborn spots and then simply throw the diaper into your diaper pail. If you would feel more comfortable rinsing them, perhaps you could get a diaper sprayer that attaches to your commode or bathroom sink to lightly spray your diapers before putting them in the pail. Many cloth diaper retailers sell diaper sprayers or mini-showers as they are often called.
Laundering Mistakes!

The following products and processes are not recommended for use in laundering cloth diapers:

Chlorine Bleach - Yes it is great for killing germs but it is bad for cloth diapers and covers. I will actually eat away at the fibers in your diapers, leaving holes and frayed edges, decreasing their durability and absorbency. It will also adversely affect the waterproofing in certain cloth diapers. Baking soda and oxygen bleach are great whiteners to use instead.

Fabric Softener - This product is equated with super soft and fresh smelling clothing, so it is only natural that you would want to use it on your cloth diapers but this would be a mistake. Fabric softener, either in liquid or sheet form – leaves a water-repelling residue on your diapers, making them less absorbent and useful in the very purpose that they serve. It also coats your diaper covers and can deteriorate their water-proof laminate.

Pure Soaps – Pure soaps are the more natural choice in the world of cleaners, but soaps will leave a residue on your diapers and covers – similar to the soap scum you find in your tub. Soap scum on diapers makes them repel moisture rather than absorb it and it is also harsh on the laminates used in your diaper covers, making them absorb rather than repel water. The best choice for washing your diapers is to use detergent on them.

CLUELESS ABOUT CLOTH DIAPERS?


So, you want to know more about cloth diapers. With the varieties available today, you’re not quite sure which one to choose to suit your baby. Or you may have questions about cloth diapers. To start you on your journey of cloth diapering, read our Mom’s guide below:

The bare necessities (or the basic questions): The world of cloth diapering has changed a lot since the days of the classic cotton square cloth and safety pins we are all familiar with. We also remember the plastic looking rubber pants that are uncomfortable, yellow over time, retain odour and leaks.

Today, the cloth diaper is a mix of natural and modern fabric materials that are soft (comfy), sturdy (machine and dryer friendly), hygienic (do not retain odor or leak) and they are very convenient! (easy to put on, take off and clean)

Polyurethane Laminate fabrics were developed for the medical industry and hold up well in the washer and dryer.

High tech microfleece/suede wicks moisture away from baby's skin and keeps them dry and rash-free. Solids roll off the microfleece easily, eliminating the need for dunking or rinsing. Use of aplix and plastic snaps make diaper changes quick and easy.

Hate pins? Now, we have the Snappi fastener made from a stretchable, non-toxic material that is shaped like an elongated T with grips on each end. These grips embed in the diaper fabric to ensure a snug-fitting diaper with enough natural movement for your baby.

The flat cotton diapers (lampin) are thin and not absorbent and hence, require very frequent diaper changes. Then, welcome to world of microfibre and hemp fabric. We have in stock various inserts to make cloth diapers trim and yet highly absorbent.

Cloth diapers basically fall into 4 categories:

1. Prefolds or flats – Flat cloth diapers are the classic cotton square which is folded to fit baby, and secured with diaper pins or a Snappi. A variation of the flat diaper is the Prefold, which includes extra layering in the center.

Flat and prefold diapers are the least expensive choice in cloth diapers, costing in the area of RM90 per dozen for prefold, or around RM25 for flat cotton gauze diapers. These diapers require waterproof outer covers, so they are a three piece diapering system (diaper, cover, closure for diaper). Read more here.

2. Fitted Diapers - Fitted cloth diapers are next step up in the evolution of the cloth diaper from the simple flat diapers or prefold diapers that were the norm many years ago. Fitted diapers are exactly what they sound like. Instead of the flat and shapeless diapers our parents may have used, fitted diapers are fitted and snug, usually with elastic gatherings in the legs and waist, making them a perfect fit for any baby. They usually have closures of some sort as well, either hook and loop, (Velcro) or snaps.

Fitted diapers are not waterproof so you do need a diaper cover to put over them but they are very easy to put on a baby and very easy to put under a cover without uncomfortable bunching. Some fitted diapers have also been known to contain a pocket for stuffing (see pocket diapers). Fitted diapers come in a variety of materials but some of the most popular choices are cotton knits, flannel, hemp, terry cloth, sherpa, bamboo, or velour. Read more here.

3. Pocket Diapers –They are cloth diapers with a pocket. Most generally have two layers, an outer layer and an inner layer, with a hole or pocket that separate the two at one point, forming an opening for the absorbent material to be inserted. The absorbent material that is inserted into the pocket is what absorbs the moisture when baby relieves himself. It can be removed later for more effective cleaning. Many moms believe that pocket diapers are the most innovative invention in diapering ever. Read more here.

4. All-in-Ones (AIOs) – It is a type of diaper that functions completely on its own without the need for extra accessories. It does not require separate soaker material to absorb or a separate diaper cover to contain leaks. All of the features are neatly packaged into one diaper. Read more here.

Now that you’re a pro on the types of cloth diapers available, your next step will be fun – making the best choice for your baby!

Which cloth diaper system for me? THIS ALL DEPENDS ON YOUR PREFERENCE! Whatever your needs and budget, there is a cloth diapering system to fit you. Here a few suggestions to fit natural cloth diapers into your lifestyle:

• You can pre-stuff a pocket diaper so you’re using it like a disposable except that it is washable.

• Aplix/Velcro is more daddy and grandparents friendly. They are also highly recommended for active, wriggly children who hate wearing any diapers.

• Microsuede fabric will keep baby feeling dry and it’s much easier to wash (since poo does not stick to it, you can use the shower head to rinse it off and then flush it down the toilet bowl). Or, you can place a flushable nappy liner on top of the prefold/lampin with any diaper cover.

• For newborns who poo and pee frequently, I highly recommend using a diaper cover over prefolds/flats (lampin) since it is cheaper, easy to change and quick to dry.

• For active toddlers, pocket diapers are easier as they fit well around the leg area, accommodating their active movements. It is also easier to customize the absorbency of a pocketed diaper especially for heavy wetters.

Which brand for my baby? 1. Diaper covers for flats/prefolds - Bummis, Thirsties and Imse Vimse This is the most economical diapering system available for use with regular flats (lampin) or better yet, unbleached prefold cloth diapers. You can also combine this with either a microfiber insert in a suede insert sock, a flushable diaper or a fleece liner to give your baby a dry feeling!

Bummis - A state-of-the art Aplix-closing cover made from a super resistant, waterproof PUL sandwiched between two layers of soft polyester knit. Especially useful for newborn babies whose bowel movements are still very frequent, Bummis are well designed with a generous cutting. You will only need one diaper cover for every 3-4 nappies/prefolds (we built the gusset in!) as they are suitable with ANY type of flat, pre-formed, Velcro or snap-closing diaper.

Thirsties - Another diaper cover made from PUL with a gusset using Velcro/Aplix closure. Available in solid colors from Newborn to Large sizes (Note: Newborn sizes have a lower rise around the tummy area to make room for baby’s healing umbilical cord.)

Imse Vimse - Made from one layer of super soft, printed, organic cotton with an internal layer of waterproof yet breathable material, this diaper cover uses Velcro/aplix closures as well.

Wonderwrap cover - is the diaper cover that grow with your baby. It can be adjusted from small to large size. Made from PUL and uses Velcro/aplix closure as well.

As long as the cover is not soiled, you can just wipe off the moisture and re-use the diaper cover again. All of these covers are also durable and stands the test of time!

2. Fitted diapers Another new favorite is the fitted diaper. As the name implies, “fitted” means that the diaper is made to fit babies and no pins or fasteners are needed as the diaper comes with snap/Aplix closures. An important point about fitted diapers is that they don’t come with a waterproof outer layer, which means you will need a diaper cover.

FITTED DIAPERS

Imse vimse: Onesize organic fitted diapers. Materials: Super soft organic cotton. Features: Great for babies with sensitive skins. Aplix/Velcro closure with cross over tab( helps to fit better for skinny babies). Fit: babies from 5kg- 15 kg.

Kissaluvs: Materials: cotton fleece for the outer, comes in natural unbleached or colored. Inner layer is made from beautifully textured fabrics to help contain even the runniest poop. Features: Sturdy plastic snaps provide easy access for parents and not so easy removal for curious toddlers. Uniquely spaced wing snaps that are adjustable according to your baby's build. Overlapping wings on the larger sizes fit even thin babies. Size: 0,1, 2. Size 0 fits newborn babies perfectly, and comes with snaps down so it won’t irritate umbilical cords.

Drybees onesize bamboo fitted. Materials: 100% un-dyed bamboo fleece. Bamboo fabric absorbs 60% more than similar weight cotton fabrics and it is naturally antibacterial meaning it's more hygienic and healthier for your skin! For sensitive and allergy prone skin, bamboo is a wonderful choice since bamboo's natural breath-ability keeps your skin comfortable and feeling dry longer. The fabric even feels cool to the touch. Features: this diaper closure with snaps and it is made from 100% natural fabric. This is the best option if you only want to use natural fabric for your babies. The snaps won’t touch baby’s delicate skin, and each diaper comes with one Drybees bamboo soaker (20% cotton , 80% bamboo). After many washes, it becomes more absorbent – and softer too! Fits: most babies right from birth to potty learning.

3. Pocket diapers - Drybees, Bum Genius, , Happy Heinys and Green Acre Designs The cloth diaper with a pocket - absorbent material is inserted to soak up moisture and can be removed later for more effective cleaning. Pocket diapers come with either waterproof or non-waterproof covers.

Here’s a table showing the important features of each brand to help you choose:

POCKET DIAPERS

HAPPY HEINYS: Material waterproof PUL + microfleece, Sizes S,M, L, XL. Features: closure: aplix/Velcro, super soft microfleece liners. Age group fits newborn to toddlers.

GREEN ACRE DESIGNS Material: Waterproof PUL + colored microsuede or microfleece. Size: S, M, Medium Long, Large. Features: using side snaps, make a curious toddler find it more challenging to open the diaper, Inner liners are made from either suede or fleece. Two snaps on each size make it very adjustable. Age group: newborn to toddler. GAD diapers also come in Medium long size especially for those tall but very skinny babies.

DRYBEES comes in Size S, M, L. Babies come in different builds and shapes so Drybees sizes will offer the best fit diaper under clothing. The sizing is generous, where Size small can accommodate babies up till about 7.5 kg. Most babies wear Medium size until the time they are ready for potty training when they upgrade. Sized diapers always offer the best snug fit result.

DRYBEES HYBRIDS ALL IN ONE is a one piece diaper system. You don't need to stuff any insert, as the microfiber insert is already sewn inside the diaper. This diaper is also topped with microsuede lining to give baby a dry bottom feeling. Since the soaker is enclosed within the diaper, these diapers are truly as easy as disposables. But all new Hybrids AIO come with pocket openings, which also make it easier to adjust their absorbency.

BUM GENIUS is a one size diapering system for babies from 8-35 pounds. You might find it rather bulky for a newborn but you can use the little weeds insert for newborns to reduce the bulkiness.

How many do I need?

Getting started using cloth diapers is very easy. The first thing you need to do is to decide how often you want to wash diapers. Most people wash them daily or on every alternate day. The next thing you have to decide is the type of diaper you want to use and what brands you want to use. Because different types and different brands work best for different babies, a good idea would be to buy a few samples of diapers and covers (our “diaper packages”) and try them.

Once you decide which you like best, you can buy more of your favorites. The ones you decide you don't like as much can be sold to other cloth diapering parents (check out our “FORUM, under “Buy and Sell).

I would encourage you to separate the washing of the covers from the inserts. Wash the covers once you are free. The covers dry fast (2 hours to less than a day) compared to the inserts (1 to 2 days). This way, you are able to reuse the covers more often.

*Moms’ Favorite Question*

How much money can I save if I use cloth diapers?

“It seems so expensive to start!” or “I’d rather choose disposables!” you may think. While the investment in the beginning seems high, there is a high cost saving when a kid is still in diapers during the 2-3+ year old period.

On average, a baby will use 6-12 diapers a day, depending on the baby's age and body weight. In a year, that’s 2,190- 4,380 pieces of diapers. That means about 6,000-10,000 diapers over the course of the 2.5-3 years in the kid is in diapers!

If the average cost of disposable diapers is RM0.50/piece, that amounts to RM1,100-RM2,000/year! For the 3 years your child is in diapers, you’ll need to multiply that by 3 = almost RM6,000 on disposable diapers alone.

That’s only the cost for one child.

And it hasn’t included the cost of diaper cream, which must be used with disposables or the wipes you use for every soiled nappy change.

Or the additional diapers baby needs on the days they don’t feel well.

With cloth diapers, the initial investment will be about RM600-800 for part-time use or a maximum of RM2,500 for full-time use. And you can use the same set again and again for your second, third, fourth, fifth, sixth child right up to that football team size family you’re planning for!

As you can see, the savings is substantial. Can’t believe your eyes? Do the math yourself with our online tool found here!

Remember also the added benefits of your baby wearing natural, breathable, clean fabrics next to his/her skin and the reduced rubbish in our beautiful environment that come with cloth diapers.

Will it cost more if I use SIZED cloth diapers compared to ONE-SIZE ones? Well, that’s not really true. First of all, the diapers that come in sizes will fit better as they are customized to fit your baby’s body. Remember: BETTER FIT = LESS MESS!!!

You won’t need to buy a lot of all sizes. You will need around 8-10 pcs Small sizes, 6-8 pcs Medium size, and you may (or not) need 4-6 pcs Large size. In total, that would be about 18-24 pcs (That would be around RM1,700-1,800! For the whole 3 years!)

One-size diapers will be a better option if you have more than one child still in diapers or for multiple babies (twins, triplets or more!).

What’s the difference between Pocket diapers and the normal lampin (flat)? Pocket diapers are formed like a disposable with the opening where you can stuff absorbent material (the inserts).The outer layer is 100% breathable PUL material and the lining part, which touches your baby's skin is microsuede/microfleece, which has wicking ability to attract moisture through the insert. The microsuede/microfleece itself will stay dry and so will your baby!

The normal lampin must first be folded into layers, then fastened with a nappy pin and covered with waterproof pants. Normal lampin will hold pee about 1-2 times of its weight. Inserts for pocket diapers can last for about 3-4 hours.

Will it be hot for the baby? No. The PUL used is usually 1mil or 2mil BREATHABLE material. The fleece used is ultra-soft and although it feels thick, it is not warm for the child.

Can I use the lampin to stuff my pocket diaper? Yes, you can. Note though that it will be bulky and won’t hold up to 3 hours like the microfiber inserts.

Does the microsuede/fleece lining really give baby a dry feeling? Yes. Microsuede and fleece has wicking abilities. This means that it can wick the moisture through the insert but the suede/fleece itself will be dry.

Also, microsuede is more pilling and stain resistant than microfleece – solid waste rolls off easily which means easy cleaning for you (or for grandma, the babysitter or the maid).

Can I put extra inserts in the pocket diaper for higher absorbency? Yes, you can. That's the beauty of the pocket diaper. You can customize the number of inserts according to your needs and baby’s comfort level.

Can I use pocket diapers for night use? Of course you can. For better protection, I would strongly recommend Drybees fleece pocket diapers at night. The outer part is made from windpro fleece fabric. This is a breathable fabric, which is thicker yet comfortable. It is not recommended for day time use in hot weather. For night time diapering, hemp inserts will work better and they are trimmer compared to microfiber inserts. Another option is to use fitted diapers with a diaper cover.

Can the inserts be washed? How long can each last before it needs to be replaced? Yes. Both the diaper outer and the insert are washable! With proper care, it can last long and you can use it for more than one child. Please see the section for tips on “how to wash your cloth diapers”.

Do I need to soak the diaper a few hours before washing? No, you don't have to. You can scrub it a bit with water and then leave it in the pail for washing when you are ready. It doesn't need to be washed immediately.

Mothers can save the environment by using cloth diapers

THE two things that usually deter people from “going green” are that it’s expensive and having to compromise on looks.

For instance, the demand for organic vegetables is low because they are expensive. And business people do not like to use recycle paper because the economical ones are brownish and rough while the ones that look good are expensive.

Better choice: Loh (left) with Danzell and Phillipa with Tara sharing their diaper experiences.

One organic food shop owner said it was inevitable for organic food now to be deemed elite products because it’s costly. So, unless the demand goes up to bring down the prices, the vicious cycle will not be broken.

Two women, who have started their own business selling environmentally friendly goods, are determined to do just that.

“I keep my profit margin low so that others will be able to afford them and this will help to encourage mothers to try the products I have on my website,” said Grace Loh who sells cloth diapers and other “green” products for babies.

Pretty: Colourful cloth diapers for babies that are environmentally friendly.

Loh, 35, is a mother of a seven-year-old daughter and two sons aged six and one year. She works from home managing online sales on her website www.lildansell.com.

“Environmentally friendly cloth diapers are different from the white ones you buy off the shelf,” she said as she unfolded the colourful cloth diapers that are embroidered with pretty motifs.

The inside flaps, that have high absorbency, are made of micro fleece and cotton. She claimed that it could keep the baby’s bottom dry for three to four hours. “The diapers come in different sizes or you can buy the adjustable one size.

“Depending on the material used and the design, each diaper can cost between RM50 and RM100 but it can last up to 10 years,” she said as she displays them on the table together with minky feeling colourful cloth bags for storing soiled diapers for wash.

Loh said a baby would require a set of eight to 10 diapers a day if they are being washed every day.

Dry bottoms: Microfleece padding inside the cloth diapers.

Her friend, Li Chan, 29, who is also in the part-time business of selling environmentally friendly goods online has started www.diapersasia.com as a forum for mothers to sell second-hand diapers.

“The price and demand for second-hand diapers are very good. Mothers can usually fetch 70 per cent of the price she paid for the diapers that are still of good condition and they get snapped up quickly,” said Li, owner of www.femchoices.com.

Li who gets her supplies from the UK and US offers for sale green soap, shampoo, cloth bags, cloth diapers and reusable sanitary napkins on her site.

“The baby cloth diapers may be expensive for a mother to buy all at once but mothers can start by putting aside some money each month as soon as they find out that they are pregnant,” Li advised.

She started this business four years ago when she returned from working in Hong Kong. “I was searching the internet for an alternative to normal sanitary napkins that usually give me rashes. When I found the alternative I thought every woman should know about it.”

She also found cloth diapers for babies and started promoting them among her friends.

Then she found and converted a new mother Phillipa Clare Yoong Li-Foong who has been using cloth diapers for her 16-month-old daughter Tara Joy Bayly for six months now.

“I plan to have more children and these cloth diapers are a long term investment,” she added.

Li said there are sample packages for mothers to try on their babies to see which one fits.

“You can also end up a diaper addict,” she warned, “because the diapers are so pretty and they sometimes come with matching tee shirts.”

Loh has close to 200 diapers in her collection and is still collecting.

Li has another long term plan to import the materials for making diapers from the US and to get women from the community to form sewing circles to make them.

This way, it would give work to poor women and to reduce the cost of cloth diapers so that more mothers could afford them.

“These products and a host of other green products should not be only for the rich,” Li said.

Diaper Changing Essentials


Diapering a baby has changed a lot in the last few decades. Gone are the days when the biggest decisions you had to make were cloth or disposable and whose turn it was. Today’s diaper industry offers an array of styles, features, accessories and gadgets to make the dirty deed easier, cleaner, and more enjoyable.

The first decision you must make is whether you will use cloth or disposable. The following are some questions to ask yourself when deciding how you will diaper your baby:

  • Which one do you feel more comfortable using?

  • Which one fits more conveniently in your lifestyle?

  • Which do you think your baby will be more comfortable in?

  • Which diaper option fits your budget best?

  • Do you have a washer/dryer?

  • Will you have time to wash the diapers?

  • Can you afford a diaper service?

Once you decide which kind of diapers you will use, stock up ahead of time. On average your baby will go through 10 to 12 diapers each day during the first few weeks; that means you will need three packages of at least 50 diapers to get you started. If you plan to go with cloth diapers, you will need six to ten packs (12 diapers per pack) of pre-folded diaper-service-quality (DSQ) diapers.

About 95 percent of parents choose disposable diapers, making the disposable diaper industry a $3.6 billion-a-year business. This means lots of different styles, features, and prices for you to choose from. Despite the vast selection, all disposable diapers fall into three basic categories, each more costly than the last.

  • The basic model is thick, bulky, and relatively inexpensive.

  • The second option is the ultrathin diaper which is often more absorbent, a fraction of the size, plasticized, and easy to fasten with tape closures.

  • The third, best, and unsurprisingly, the most expensive option is premium diapers which are super-absorbent, and have a cloth-like cover and easily re-closable fasteners.

Disposable diapers come in a wide range of sizes, from preemies (for babies under five pounds) up to a size 5 or extra-large for bigger babies and toddlers. The only way to figure out which diaper works best for you and your child is to experiment. The perfect diaper will absorb about four urinations, and keep wetness away from your baby's skin to prevent irritation and diaper rash. It will also fit your baby well enough to prevent leaks at the waist and legs. Keep in mind that size guidelines mean different things to different brands, so some may fit your baby's body shape better than others. The diaper should also be easy for you to work with and afford in bulk. And don't be afraid to try a generic store brand diaper; finding a good one could save you big bucks over time.

Cloth diapers tend to leak more, but they can save you a significant amount of money if you wash them yourself. However, home washing machines may not sterilize the way commercial units can. The other option with cloth diapers is hiring a diaper service, which is convenient but costly. If you do choose cloth diapers you will need to also purchase plastic pants or diaper wraps, which are made of waterproof laminate between two layers of polyester knit, and Velcro over the cloth diaper to prevent leaks. Another advance in the world of cloth diapers is the pin-less diaper clip. Struggles with sharp, tricky pins are a thing of the past with these plastic, easy-lock clamps that fasten quickly and firmly onto all sizes of cloth diapers.

Another option for those who use cloth diapers is the Kushie All-In-One Diaper. These washable 100% cotton flannel diapers are reinforced with an absorbent middle layer and an outer waterproof barrier for leak protection. An adjustable Velcro waistband provides a secure fit. These diapers fit well and wash and dry easily, and are durable enough to last through several children. The main drawback is the price. They usually come five to a package and run about $50 a package. But if you're planning to have more than one child they are a very cost effective choice.

Diaper liners are a good way to get more mileage out of every diaper (cloth or disposable). They add absorbency and make diaper cleanup a breeze. Simply apply a liner to each diaper and throw it away when wet or soiled. Chemical-free liners help ward off diaper rash by wicking wetness away from your baby's skin, and they also provide added protection for overnight or long car rides.

Don't forget to have a good, all-purpose healing ointment on hand in case diaper rash erupts. If you catch and treat diaper rash early it will leave as quickly as it appeared. A & D Ointment is a favorite among the diaper set. This is a clear petroleum-based ointment enriched with healing vitamins and should not only heal diaper rash quickly, but will protect baby's tender skin from future outbreaks if used regularly. It also works wonders on little cuts and scrapes.

Diaper Accessories

Now that you have a dirty diaper, what do you do with it? Old-fashioned, pop-up-lid diaper pails can be messy, smelly, and unsanitary unless cleaned several times a day. But two new innovations can help you overcome the smell and hassle of dealing with dirty diapers: the Diaper Boss and the Diaper Genie.

The Diaper Boss is a one-handed diaper disposal system that lets you throw away dirty diapers while keeping one hand securely on your baby. The Boss hangs on the changing table or wall for easy access. It has a double-lid system with deodorized bags to hold the diaper and lock in odors. Emptying the Boss is a snap: simply toss the liner bag in the trash.

The Diaper Genie has a wide mouth that lets you slip diapers through to a self-contained bag that you seal off after each disposal. In seconds, the Genie compacts a soiled disposable diaper, wrapping it in a strong layer of scented plastic film. You just insert the diaper into the Diaper Genie, give the lid a twist, and the diaper is sealed and stored in the container base.

Now that you’ve taken care of diaper disposal, here are a few other accessories to make diaper duty safer and more enjoyable: The Diaper Holder by BabySmart is simple in design but essential for baby's safety during diaper changes. This space-saving diaper holder stores diapers in a clear plastic rack so a fresh diaper is always within reach. It clips on to edge of changing table, allowing you to keep one hand securely on your baby during diaper changes.

The next item is more of a creature comfort. The Wipes Warmer, manufactured by Prince Lionheart, keeps wipes toasty warm for your baby. Simply lift the lid, drop in a stack of wipes, and the warmer will heat the wipes to an adjustable, bottom-friendly temperature.

Diapering on the go is made easy with the Fold & Go Changing Kit — perfect for tucking into your purse on a trip to the park or a day of shopping. Two foldout pockets hold diapers and a reusable case for wipes. And there's room to tuck a few small items such as an extra T-shirt or diaper ointment into each pocket. The kit has a sturdy moisture-resistant changing surface and is a snap to clean. A convenient carrying handle will allow you to snap it onto the stroller for easy transport.

The Portable Changing Pad by J.L. Childress ensures germ-free diaper changes whenever you take your baby out in public and is a favorite of dads because it's small enough to fit in his back pocket. It’s fully padded and waterproof and the soft vinyl is gentle on baby's little bottom. The pad opens up to a generous 19 x 14 inches and you can attach diapers or wipes with a clinch strap.

Whether you choose cloth or disposable, high-tech accessories or just the basics, diaper changing time is a great opportunity to interact and bond with your baby, so take the time to play games and sing songs. You may find that your baby looks forward to diaper changing in anticipation of all the fun!

Spacing of Siblings


Once you've settled into your new family role and your little one begins walking and talking, you may find yourself missing that little being that needed you so much, such a short time ago. For many couples, this is the time they start thinking of having another baby.

Many women ask, "When is the right time to add to our family?" It's a very personal decision and one that needs to be well thought out. Work commitments, family financial needs, and the health of the mom can all play key roles in the spacing of sibling births. How you and your partner view the idea of family and how many children you each wish to have, needs to be taken into account.

There are both advantages and disadvantages of spacing your children's births close together or farther apart. If the children are within two years of each other, they're more likely to accept another sibling because they wouldn't remember much about having the parent's undivided attention. They're more likely to adjust to each other easier, and be more content to play together on somewhat the same level, helping them form that special bond.

Children spaced farther apart, tend to grow farther apart as they mature and each goes their own way. The relationship shares less in common over the years, but usually develops a kind of hero worship of the younger to the older sibling, and a protector or guardian role for the older toward the younger. Spacing children farther apart can allow more focus on an individual child's interests, seeing their activities as their own rather than following along behind the other for convenience sake.

If the children are born close together, you will get through the baby years of bottles, diapers, and potty training pretty much all at once. This can be a most exhausting and challenging period in parenthood. Just think of having two children in diapers. The cost alone is staggering. On the good side, you won't have to purchase so many of the necessary items all over again.

When siblings are born further apart, there is more of a demand put on you for your undivided attention. An older child can feel left out or pushed aside, sometimes resulting in inappropriate behavior in order to get attention. With a little guidance, on the other hand, an older sibling can be a tremendous help to you in simple tasks that are age appropriate, such as: picking up after themselves, occasionally changing diapers, or playing or reading to the baby while you're preparing dinner. Praising your child for being a big help to mom can provide positive reinforcement, encouraging them to repeat these behaviors in the future. Making time to spend with each child alone is important. An older child needs to feel special and that can require more adjustment time when new siblings enter into the family picture.

Either way you look at it, there is no "perfect" formula in the spacing of siblings. Kids are kids. They have to be taught right from wrong and how to respect their siblings regardless of the age distance between them. All of us who had siblings growing up have "fond" memories of our sibling relationships. Remember how well you always got along with your brothers and sisters? Just like the Brady Bunch.

Friday, January 23, 2009

My Outing Bag

I used to bring along a big black Cleef bag whenever I went out for shopping with Hadiff and hubby. But later I found it troublesome especially when Hadiff refused to be placed inside his stroller and begging me to be held instead. Leaving the bag inside the stroller is of course risky with possiblity of bag snatcher somewhere near you. So I change to backpack which appear to be much more convinient. Thanks to Umobile for giving this bag to my hubby!
Whats in this bag?
1. A MUST bring baby pouch
2. 3 Huggies drypers
3. 1 pack of wet tissue
4. A pair of Hadiff clothes.
5. A wet towel
6. A battery operated fan
7. Purse
8. Handphone
9. A pair of contact lenses
10. A pack of tissue (sometimes)
11. Make up bag

Wednesday, January 21, 2009

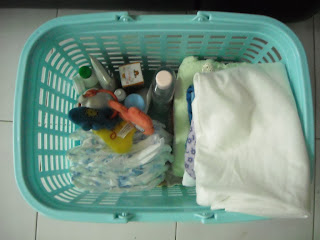
Whats in Hadiff basket?


1. 2 pairs of day wear
2. 2 pairs of nite wear
3. 2 pairs of socks
4. A dirty cloth bag
5. Hadiff favourite musical toy
6. A bip
7. Telon oil
8. Sebamed bubble bath liquid
9. Redwin lotion for sensitive skin
10. Antifungus cream
11. Cotton buds
12. Nail scissor
13. Anakku baby shampoo
14. 6 Huggies drypers
15. A towel
16. 2 small towels
17. A Dr baby teat in a small Tupperware
18. A bottle of baby oil
19. A cool bag that contains 7 bottles of my breastmilk and 4 icepacks.

Before I go to bed, this is a MUST work to settle.

Friday, January 16, 2009

10 steps to help baby sleep through the night


When trying to teach your baby to sleep through the night you shouldn't expect miracles right away, every baby is different and some will get the hang of sleeping through very quickly while others may need a little more perseverance. However, by being consistent with whatever routine you and your partner choose, your baby will eventually master the art of settling him or herself to sleep and you'll be able to enjoy nights of uninterrupted rest - good luck!

1. Teach your baby the difference between night and day

Babies are born with no concept of circadian rhythm and so have little understanding of the difference between night and day. The only way they will learn that day is for being awake and active and night is for being asleep is if you teach them. The easiest way to do this is by giving your baby lots of attention and activity in the day and as little stimulation as possible during the night hours.

When you're feeding your baby in the day make sure that it's a bright environment with lots of noise and stimulation - try talking or singing to your baby as they feed. On the other hand, keep light and noise to a minimum during nighttime feeds so that your baby stays relaxed and doesn't become fully alert. Along the same lines try not to make daytime naps too dark or too quiet so that your baby learns to differentiate them from nighttime sleep.

2. Establish a bedtime routine

Getting your baby used to a bedtime routine featuring a relaxing bath, a story and a cuddle (or whatever works for you) will help them to understand that it's time to settle down for the evening and will give them cues about what they're expected to do next . Try to make the bedtime routine as relaxing as possible so that it's easier for them to become drowsy and learn the cues for sleep.

3. Teach your baby that cot equals sleep

When your baby starts to look tired and get fussy , be it day or night, make sure that you lay them down in their cot or moses basket before they fall asleep. This will help your baby to learn that being in their cot means that it's time to nap. By the same thread, try not to leave your baby in their cot for too long after they've woken up (providing it's not the middle of the night) as this will help reinforce the idea that cot equals sleep.

4. Teach your baby to settle themselves

Although it can be difficult, you should try to avoid rocking or feeding your baby to sleep as this often leads to an inevitable howling session when they wake and aren't in your arms. If you get your baby completely ready for bed, place them in their cot while they're very drowsy but not actually asleep and then stay with them until they dose off, over time they'll begin to settle themselves so that eventually you'll be able to leave the room when they're still awake.

5. Use a comforter

Babies often startle awake in the night and then start to cry because they feel alone. To overcome this problem you could try putting their favourite blanket or toy in their cot with them (or at least in eye sight) as often simply seeing their comforter can give your baby the feeling of security they need to fall back to sleep. It can help if you cuddle their soother for a little while before placing it in the cot so that it becomes 'mummy scented' as this can reassure baby that you're close to hand during the night.

6. Make sure the temperature is right

It's a good idea to keep an eye on the temperature of your baby's nursery, as not only will your baby be uncomfortable and more likely to wake up distressed if she is too hot or too cold, but also maintaining a regular temperature will help to reduce the risk of SIDS. Your baby's hands and feet can often feel colder than the rest of their body so try using the temperature of their tummy as a gauge.

7. Leave your baby to chat

Often your baby will wake in the night and then settle him or herself back to sleep soon after without your help. For this reason when you hear your baby wake, unless they are crying, try to avoid getting up just to check on them as there is a good chance that they may go back to sleep on their own accord.

8. Don't pick your baby up

If your baby is distressed you should go to her straight away but unless they're ill or you are away from home in a 'strange' place don't take them out of their cot. Instead, stand by the side of the cot, holding their hands, rubbing their tummy and talking or singing to them until they relax back to sleep. After a couple of nights doing this you should try to leave it a couple of minutes before you go to the cot side, gradually extending the time you take night by night.

9. Gradually retreat

After a few days of soothing your baby back to sleep you can start retreating towards the door after a few minutes of comforting. How you do this is entirely up to you, you can immediately leave the room for a few minutes before going back to comfort your baby or, alternatively, you can stay in the room with your baby soothing them from a distance. Gradually start to increase the length of time you're away from your baby until they starts to settle without your help.

10. Persevere

It may take well over a week for your baby to learn to sleep through the night (this equates to roughly 6 hours for a newborn and 10-12 hours for a one year old) and you may have to endure hours of torturous crying in the process. However, if you and your partner persevere together, providing support for each other during the sleepless nights and taking it in turn to reassure your baby, gradually you'll notice that they wake less, with each each crying episode getting shorter and each successive night getting better.

Storing breast milk

Whereas it is inadvisable to store formula milk, current guidelines suggest that it is safe to store breast milk for later use. However, there are certain recommendations for storing, freezing and thawing breast milk that you should follow to ensure that it is safe for your baby to drink.
  • Room Temperature - you can store breast milk at room temperature for up to 4 hours.

  • Coolers - you can store breast milk in a cool box or bag fitted with frozen ice packs for up to 24 hours.


  • Fridge - you can store breast milk in the back of a fridge for 3 - 5 days.


  • Fridge Freezer - you can store breast milk in the coldest part of a fridge freezer for up to 3 months.


  • Deep Freeze - you can store breast milk in the coldest part of a deep freeze for 6 - 12 months.
When storing or freezing breastmilk you should use a sealed, sterilised container or special leak proof milk bag. When freezing breast milk it is advisable to separate it into small portions as this makes it easier to defrost and avoids wastage. Additionally, you should use an adhesive label or piece of masking tape to date the containers and use the oldest first.

You should never defrost breast milk in the microwave as it is unlikely to be heated evenly with hot patches that may burn your baby. Instead you can either thaw breast milk in the fridge, place the container in a bowl of warm water for 20 minutes or hold it under warm running water.

You should never refreeze milk that has been defrosted and should always use thawed milk within 24 hours of removing it from the freezer.

It is common for breast milk to separate when stored for any length of time as the fat forms a layer on the top of the breast milk - if this happens simply shake the bottle until the fat has integrated back into the milk, it will then be safe for your baby to drink.

Sterilising baby feeding equipment


As babies do not have fully developed immune systems it is important to thoroughly sterilise all of their feeding equipment (including bottles, teats, beakers and pumps) to protect them against infection. This is especially important for babies who are predominantly bottle fed with formula milk as they do not receive the enhanced immunity provided by breast milk and so are more susceptible to infection.

Before sterilising your baby's feeding equipment you need to wash it thoroughly in hot soapy water. You should use a bottle brush to clean off any remnants of milk and ensure that the teats are clean by washing both sides and then running water through the hole.

It is possible to clean feeding equipment in the dishwasher however this should always be on the hottest setting (teats are more likely to wear if frequently washed in this manner). Whether you clean your baby's feeding equipment in the dishwasher or by hand you should check to ensure all traces of milk and detergent have been removed before sterilising.

Methods of sterilising

  • Boiling - This is the traditional method of sterilising bottles. You should use a saucepan that has not been used for any other purpose (i.e. cooking), fill it with water and fully submerge the bottles inside. You will need to boil the equipment for at least 10 minutes.


  • Steaming - Steam sterilisers are readily available and are an efficient way to ensure that bottle feeding equipment is safe to use. They only take approximately 8 minutes to work and if sealed can keep equipment clean for up to 3 hours.


  • Sterilising solutions - These often come in the form of a tablet which you dissolve in cold water. They take approximately half an hour to work (although you should check individual instructions) and often allow you to leave bottles soaking for up to 24 hours if sealed, although you shouldn't leave them longer than this without changing the solution. It is possible to use any container with a sealed, fitted lid however special sterilising containers with plungers that keep bottles fully submerged are also readily available.


  • Microwavable sterilisers - Steamers for use in the microwave are available although you cannot use them to clean equipment with metal components. Additionally self-sterilising microwavable bottles are also available.
  • When sterilising bottles and other feeding equipment you should ensure they are fully submerged for the whole time and check that there are no air bubbles present. Additionally, you should dispose of bottles and teats once they are showing signs of wear and tear as they become more difficult to fully sterilise once cracks are starting to form in the plastic.

    After you remove your baby's feeding equipment from your chosen sterilisation container you should fill it with milk as soon as possible to avoid contamination.

    Current guidelines suggest that you continue sterilising your baby's bottle feeding equipment until they reach 1 year of age.

    The basics of breastfeeding

    Getting started

    As soon as possible after your baby is born lift them onto you so that your baby has direct skin contact. Newborn babies get cold easily so you will need to make sure your baby is dried and that you are both covered in a couple of towels or blankets.

    Placing your baby directly on you will help keep them warm, help them to adjust to newborn life and allow you to get to know each other better. After a time your baby will start to lick their lips and open the mouth turning their head sideways. These are signs that your baby is ready to feed.

    Latching on

    Ask your midwife or partner to help turn your baby so that your bodies are facing and your baby's nose is in line with your nipple. In this position when your baby opens his or her mouth they should be able to latch onto the breast correctly.

    Your baby needs to have a lot of the dark area around the nipple in it's mouth in order to feed. It does not feed from the nipple but from the breast itself. The best way to help your baby latch on is to wait until the mouth is wide open and then move your baby onto the breast aiming the nipple towards the roof of your baby's mouth - this can take a little practice.

    When fixed on the breast properly your baby's bottom lip should be turned down and the nostrils should be clear of the breast so that he or she can breath easily. This can be difficult to see but your midwife or partner will be able to help you.

    When your baby feeds you will notice that there is movement in the whole jaw. If this is not happening or your baby is sucking his or her cheeks in it might not be attached correctly. If in doubt ask your midwife.

    If your baby is latched correctly breastfeeding is not usually painful. If your baby starts to feed the first few sucks may cause you some discomfort, after this things should get better.

    If you find that things get worse as the feed goes on your baby may be sucking at the nipple. Slide your finger gently into your baby's mouth to break the seal, lift them away and start again. If it is possible, get someone to help you.

    Introducing breastfeeding

    Breastfeeding allows you to provide your baby with all it needs for growth and development. Breast milk not only contains all the nutrients your baby needs, in an easily digested form, but it also contains antibodies to protect your baby from all kinds of infection.

    There are substances in breast milk, which cannot be reproduced. You alone can provide these living factors for your baby. Breastfeeding is a really positive thing to do. It is not only good for your baby, it is good for you. The advantages are numerous.

    The main advantages of breastfeeding for your baby

    • Breast milk is the only food specifically designed, by nature, to meet your baby's individual needs.


    • It contains the right balance of nutrients in a very easily digestible form.


    • Antibodies are passed on through breast milk to protect your baby from all kinds of infection. The longer you can feed your baby the better but if you breastfeed for the first three or four months this protection can last for up to a year.


    • Your baby is much less likely to need to be admitted to hospital.


    • Your baby is less likely to develop diarrhoea or constipation.


    • Breastfeeding reduced the incidence of allergies such as eczema and asthma.


    • Breast milk contains growth factors and hormones to help your baby's development. These cannot be reproduced in formula milk. Children who have breast fed for eight months or more have been shown to achieve more at school than those who have been bottle fed.
    The main advantages of breastfeeding for you
    • Breastfeeding helps your body to return to normal after the birth and burns up to 500 calories a day.


    • Breast milk is always ready and it costs nothing


    • Women who breastfeed often feel a special bond with their baby and may be less likely to develop postnatal depression.


    • Breastfeeding may offer you some protection against developing ovarian cancer, breast cancer and hip fractures.
    The main disadvantages of breastfeeding for you
    • Blood borne viruses such as hepatitis B or HIV and some medication can be passed on to your baby in breast milk.


    • Some women find breastfeeding painful, stressful and tiring


    • You are unable to measure the amount of milk your baby has consumed, this can be a disadvantage if your baby is having problems putting on weight.


    • It can be difficult for a breastfeeding mother to leave her baby for more than a couple of hours as no one else can feed baby unless she leaves expressed milk.
    Nearly all women can breastfeed, but many do run into problems. It is important to ask for help. Feeding can take a number of weeks to establish properly. Once established most women then find feeding easy and enjoyable.

    The most important thing to know about breastfeeding is how to position your baby during a feed. If your baby is in the right position then everything else will follow.

    Advantages of Breastfeeding


    Pediatricians, midwives, nurses and even formula manufacturers all agree that breastfeeding is the best thing for your baby. With breast milk containing the perfect amount of antibodies, water, fat, carbohydrates, protein, vitamins and minerals, served at the perfect temperature and in the perfect container, formula will always come in second place as best for your baby. Below are some of the advantages of breastfeeding.

    • Breast milk is personalized for your baby – Your breast milk contains the perfect amount of everything your baby needs. With your breast milk continually changing to meet your baby’s needs, it’s always just right.

    • Protection from allergy – Your baby will be less likely to get allergies, which the strong proteins in cow’s milk can cause.

    • Can protect against respiratory problems like asthma.

    • Less chance of obesity – Since breast fed babies are able to follow the demands of their appetite, breastfeeding may help reduce the chance of becoming over-weight.

    • Nursing for at least one year has been shown to reduce stomach infections.

    • Easier to digest – Your breast milk is designed for your baby’s new sensitive digestive system. The amount of proteins and fats in your breast milk is individually tailored to your baby’s needs.

    • No constipation – Since breast milk has a natural laxative effect, infants who breastfeed will rarely become constipated.

    • Convenience – With breastfeeding there is no worry about keeping bottles and nipples clean, carrying bottled milk and keeping it at the proper temperature. Breast milk is always ready to use and at the perfect temperature.

    • Money saving – Breast milk is free, where bottle-feeding can get expensive for the formula, bottles and nipples.

    • Good for the mother – Breastfeeding creates a surge of the hormones in your body, which helps your uterus to contract and shrink to its pre-pregnant size. Breastfeeding can also delay the return of your periods providing you from a reprieve from that “time of the month”. Take note that this is not always the case; so don’t count on it.

    • Strong emotional mother-baby benefits – The skin to skin contact and cuddling during breastfeeding creates a wonderful bond between mother and baby. There is nothing better than the eye-to-eye contact, skin-to-skin contact, cuddling and talking time that takes place during breastfeeding.

    • According to the American Academy of Pediatrics - "Human milk is the preferred feeding for all infants, including premature and sick newborns."
      "Epidemiologic research shows that human milk and breastfeeding of infants provide advantages with regard to general health, growth, and development, while significantly decreasing risk for a large number of acute and chronic diseases. Research in the United States, Canada, Europe, and other developed countries, among predominantly middle-class populations, provides strong evidence that human milk feeding decreases the incidence and/or severity of diarrhea, lower respiratory infection, otitis media, bacteremia, bacterial meningitis, botulism, urinary tract infection, and necrotizing enterocolitis. There are a number of studies that show a possible protective effect of human milk feeding against sudden infant death syndrome, insulin-dependent diabetes mellitus, Crohn's disease, ulcerative colitis, lymphoma, allergic diseases and other chronic digestive diseases. Breastfeeding has also been related to possible enhancement of cognitive development."
      "There are also a number of studies that indicate possible health benefits for mothers. It has long been acknowledged that breastfeeding increases levels of oxytocin, resulting in less postpartum bleeding and more rapid uterine involution. Lactational amenorrhea causes less menstrual blood loss over the months after delivery. Recent research demonstrates that lactating women have an earlier return to prepregnant weight, delayed resumption of ovulation with increased child spacing, improved bone remineralization postpartum with reduction in hip fractures in the postmenopausal period and reduced risk of ovarian cancer and premenopausal breast cancer." Read the complete American Academy of Pediatrics statement here or visit the AAP site for more information.

    Hadiff turns 2months 16days


    Hadiff is a lucky baby who is currently on exclusive breastfeeding. He only consumes his Ummi's breastmilk with no allowance to other fluid. His first toy is a set of soft tiny hanging pads that produces 4 sound when it is pressed. It was a gift from my friends in The Netherland. Thanks to Jitske.

    That Moments


    Muhammad Hadiff Raef Hazari was born at 10.49am on 30th September 2008, sharing a same birthday date with his ummi. He was 3.19kg by then. His Abah was brave anough to witness the delivery. There are many 3s for him, 30 September, 30 Ramadan, 3kilos, at his mother age of 30 with his mother admitted for 3 days waiting for him.
    Related Posts Plugin for WordPress, Blogger...